Mercedes CLS55 Engine Valve Cover Gasket Replacement W219 W211 E55 M113K 55K
This DIY guide is applicable to all M113 Kompressor and NA engines. The process is also the same for M112 engines but with different part numbers for gaskets applicable to the V6 rather than the V8.
These engines have a known problem that develops over time where the valve covers (particularly the breather case attachments to the top of the valve covers) begin to leak oil.

A noticeable oily residue or drip marks can often be found on the covers along with dirt that has stuck the oil. If left for a long time, the oil consumption will increase and it makes a mess of the engine bay.
The valve covers need to be removed and resealed with new gaskets and the breather tanks must also be removed from the covers and resealed. The breather tanks don’t have a gasket and only use a sealant (which is probably why they degrade over time!)
What You Need
Mercedes Benz Sealant A003989982010
Replacement Stainless Steel Breather Screws A000000004436
Replacement Gaskets A113 0160 221 and A113 0160 321 (for V8)
Febi Bilstein Rocker Cover Gasket 46040 LH
febi bilstein 43697 Rocker Cover Gasket
- Torque Wrench (4-8Nm)
Sealey 3/8-inch sq 2-24nm/1.47-17.70lb.ft Torque Wrench Micrometer Style Drive
- Wrench and Extension Set
Draper Expert 71244 71-Piece Metric/AF Vortex and 1/4-Inch and 3/8-Inch Square Drive Gear-Ratchet Combined Socket Set
- Inverted Torx E10, Torx T30, Torx T25
Male / Female / Torx / Star / Tamperproof E Type Sockets 3/8 Drive 34pcs AT447
- Degreaser/Brake Cleaner
STP ST72500EN Brake Parts Cleaner, 500 ml
WD-40 Specialist Degreaser 500ml
1. Remove the Engine Cover and Air Box
These lift off the clips and mounts at each side of the supercharger and the air intake pipe at the rear of the engine unhooks from the retention clip and the whole intake inc. filters comes off as one piece. The black intake tubes from the front of the car pop off and must also be removed.

2. Remove the Ignition Coil Packs

These come undone with a T30 bit and you need to disconnect all the ignition leads from the spark plugs. Also disconnect the power supply leads from the top of the coil packs and keep the loom out of the way. Mark each pack such it can be replaced in the same position and with the same connections to the respective plugs.
3. Remove the Valve Cover
Make sure the entire area around the covers is as free from loose dirt and oil as possible before you remove anything!
You need to use an E10 bit to remove the bolts holding the cover in place. Longer ones are used for the sections that go through the breather tanks and shorter ones everywhere else around the cover.
The smaller screws (T25) that hold the breather tanks to the valve covers should also be undone.
Carefully remove the small breather hoses that connect to the breather tanks – these can be brittle due to age and if they are in bad condition should be replaced.
The entire cover should be loose now and with a bit of resistance should lift off the head. On the passenger side (right side of the engine as you look at it), a braided fuel rail runs along the top of the rear end of the cover. I managed to remove the cover without needing to undo this line but it is easier to remove with it disconnected. If you want to disconnect it, use a wrench to loosen it and have something ready to catch any fuel left in the system as it drains.

Not looking too bad for the mileage and is due an oil change anyway!
Use some rags or bags to cover the valve train to stop any debris getting into the engine while you work on the covers.
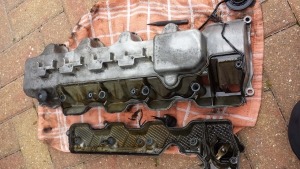
Remove the old gaskets from the covers.
4. Clean the Valve Covers
The covers are made from Magnesium and need to be treated very carefully as they are brittle and quite thin. First, remove the breather tanks from the valve covers. They should pull apart by hand now as the only thing holding them together is sealant. Do not, under any circumstances, use a screwdriver to try and separate the breather tanks from the covers!
Once apart, douse the whole lot with some degreaser and stick it in the dishwasher for a cycle. No really.

Let them dry thoroughly – there must be absolutely no water left anywhere. Clean them thoroughly – especially in the grooves to remove the old sealant.
5. Re-Seal the Breather Covers
Clean out the groove that runs on both mating surfaces with a plastic tool. You need to make sure the best possible surface is available to the sealant when it is applied. This means no oil or old sealant or dirt.
When cleaned out, apply a thin bead of sealant along the channel on the breather covers. Less is more here – if there is too much, it will spill out over the edges when the surfaces are pressed together and if you have a lot of that on the inside edge, that’s just going to get sucked into the engine and clog an oil intake or something.

I took the opportunity to paint my valve covers to sharpen the engine bay up a bit. I also removed the surge tanks and painted them too while I was at it. Details here.
Push the breather covers onto the valve cover positions and use the new screws to secure them while the sealant cures initially. Do not over tighten these screws as they WILL shear off! They are done to 4Nm.
6. Apply New Gaskets to Valve Covers
The recommendation and in fact, proper instruction from Mercedes is to apply the new gaskets to the bare, cleaned out channel on the valve cover (i.e. without any sealant). There seems to be a mixed opinion on this detail but in the end, I decided to apply a very, very thin bead of sealant in the channel and laid the gasket on top. I did not apply any sealant to the flat mating edge of the head.
7. Reseat the Valve Covers
Ensure that the mating surface is clean and free from dirt and oil that would prevent a flush contact between the head and the cover gasket.
Place the cover back on to the head and line it up with the bolt holes ensuring that the gasket is flat and making proper contact.
It is possible to re-use the same bolts (E10) to fasten the cover – I opted to use new ones. As before, the long ones go through the breather tanks and the short ones everywhere else. Pay attention to any additional equipment that mounts here (there is an earthing connection and some brackets that use the bolts). Torque these bolts all to 8Nm in a star pattern – again, do not over tighten. There is no point as the Gasket is not a crush type and the covers have metal stops cast into them to prevent damage to the head from over tightening.

Note that the above picture shows the surge tanks removed – this is not necessary when replacing just the valve cover gaskets. I had removed them to paint!

8. Reinstall Everything
With the covers back on, you can now reinstall the ignition coils and leads and reconnect them to the loom. The air intake and breather pipes must all be reconnected.
Leave the sealant for an hour or so (the Mercedes one is pretty quick curing and very good) and then we’re ready to start the car up.
9. Check for Leaks
Use a torch, mirror and anything else handy to check for leaks as soon as you start the engine. Look especially around the breather tank seals that have been redone and then around the bottom edge of the cover gaskets. There may be some smoke as a bit of oil burns off from when the covers where off and some may have dripped onto the manifold. There must be no fresh oil!
If all seems well, job done. Reinstall the intake pipes and engine cover.


Anyone knows oem number of breathes pcv valve cover to e55