Mercedes DAB Tuner NTG2.5 Retrofit Upgrade with Existing TV Antenna W219 CLS
I recently retrofitted a full NTG 2.5 entertainment system to my W219 CLS (see this post).
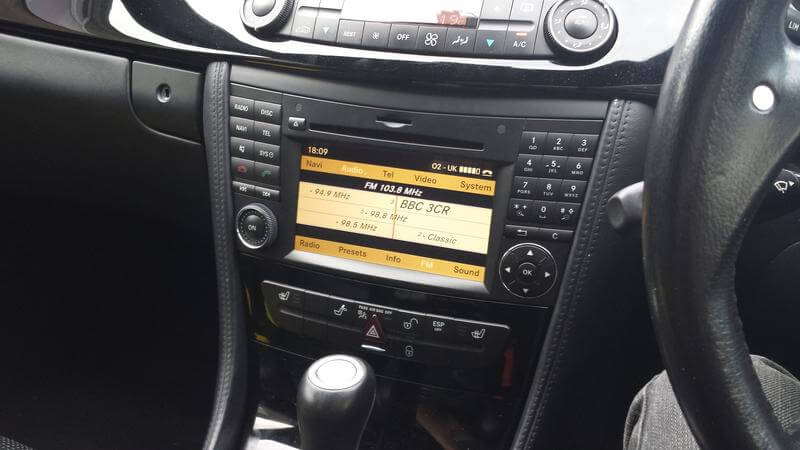
Among other things, this system has the ability to receive DAB radio broadcast here in the UK by using an additional DAB Tuner module. I managed to source the genuine Mercedes part (A204 870 54 90) and fitted this into the car. This guide outlines the steps I took to get this working.

Connections
Like most equipment in the system, the DAB Tuner needs:
a) A connection (IN and OUT) to the fibre optic loop (MOST bus)
b) Normal wire connections for the Power, Ground and Wake Up signal
and also (obviously) requires an antenna connection to receive a signal in the correct band/frequency for DAB.
Antenna Connections
In most modern cars, the antenna is often incorporated into the rear windscreen or in a small stubby roof ‘shark fin’ unit. In more complex systems, the signal is then fed into an antenna amplifier that boosts and splits the signal into the different frequency bands for various applications (e.g. FM Radio, GPS, DAB, DVB-T/TV etc).
The disadvantage is that if the car only has the output for FM Radio, that antenna feed cannot be split after coming out of the amplifier as the DAB frequencies are filtered out in the amplification process – which makes getting a signal for DAB a little more difficult.
In this case, there are a couple of options:
a) Get a new antenna amplifier and loom from Mercedes that includes the correct outputs for DAB
b) Use an external (or internal) DAB antenna. This will be entirely separate to the main antenna system in the car and depending on the quality of the antenna and where/how it is mounted, may not give a good signal.
Since my age of W219 (i.e. pre 2009) never came with DAB as an option, I could have gone with the expensive route of replacing the antenna amplifier and loom, but since the car did originally come with a digital DVB-T Tuner (when the car had NTG1 – since removed), I had a third option:
c) Use the now dormant 4 connector DVB-T antenna feed. Since the DVB-T UHF frequencies are very similar to DAB, this should work.
The 4 way connector must be partially dismantled and the YELLOW ended cable in the 4 way block removed and plugged straight in to the OUTER of the two Fakra inputs on the DAB Tuner. The inner one is unused as it is for L-band which is not used in the UK and the remaining 3 connectors on the TV Tuner antenna feed are also unused.
Power and MOST Connections
Since the TV Tuner was no longer in the car, I used the also now dormant power connector block and re-wired the necessary cables to a new connector for the DAB Tuner.
This required part numbers:
A002 545 84 40
A000 545 84 30
Which I picked up for around £2.00-3.00 at my local Mercedes dealer.
For the DAB tuner, the following pins are used in the small 4 way connector block:
Pin 1: Ground (Brown)
Pin 2: +12V Live (Red)
Pin 3: MOST Wake Up Signal (Pink)
I had some MOST optic cable loom and plug ends also left over from removing the TV Tuner so I reused these in the new connector block I purchased. NOTE: If, like me, you retrofitted NTG2.5, make sure the optical cable section being used is still in the loop and hasn’t been disconnected! You can do this with a bit of trial and error by powering on the Comand Headunit and seeing if the red light comes through to one of the ends – you need to be quick as if the optical loop is broken for longer than about 10 seconds when the system starts, it will stop transmitting and you need to power off and back on again.
Coding
If it has not already been done, the system will need to be ‘coded’ to enable the DAB feature in the Headunit. Mine was already enabled so worked straight away.
I’ve had no reception problems and much better performance than other in car DAB systems I have used, the audio is noticeably better than regular FM and there is much more choice!
Recommended upgrade!
Footnote: Using the TV Tuner power connectors, MOST and TV antenna feed for the DAB tuner means that if an NTG2.5 TV Tuner was to be added in the future, further wiring would need to be added and work with the antenna would need to be done to fit it. At the moment, I have no plans to add a TV Tuner and I never really used it when I had it before so for me, DAB was a more useful option.

Hi,
Nice write up. I’m looking to do something similar with my facelift 2009 CLS with factory fit NTG2.5. There’s no TV antenna, but i think the rear screen aerial is preinstalled. I’d like to go as OEM as possible with my DAB install, but have run up against a knowledge void. Google is generally good for this, but this seems to be a bit of a niche project…
I’ve sourced a used DAB module (cheap)
I can get the relevant cables/aerial amp from command.co.uk (expensive, but don’t see any other alternative)
I have a friendly indie to code for me
Where does the DAB tuner physically interact with the MOST Bus/Head unit? I assume i’ll have to run a new optical cable from the boot to the head unit, but where does it plug in?
I’d go down the route of the in2digi, but am reluctant to throw money at the problem if for less i can get an OEM solution.
Thanks in advance for any help you can offer.
Al
Hi there,
As far as the cabling is concerned, yes you’d probably need the specific aerial amp + loom which will have the correct connection/filters for DAB + whatever else is fitted to your car. I didn’t come across anywhere else that could supply this if needed – finding the correct part number seems a bit difficult…
Do you have Harman Kardon fitted?
If so, you’ll have the main amplifier (and sub amp) already in the boot with NTG2.5 and you can tap into the MOST bus optical loop from there with minimal fuss (a short bit of optical cable and associated plug housing).
If you don’t have the Harman Kardon setup, then you will need to get to the optical connections at the headunit so you are correct – you’ll need to get an optical cable and associated plug housing run down the car.
If you have the iPod interface MCI connector in the glovebox, then you could alternatively get a connection to the MOST bus from the module that sits behind there too to avoid removing the headunit.
If you can stretch to the OEM solution, I’d recommend it – it’s just so much more integrated and feels like a better solution overall.
Good Luck!
Thanks for the reply. I’ve got the HK amp, so that might make the fit easier. I’ll give comand.co.uk an e-mail and see if their kit will interface. I’m collecting the DAB module (the same one you used) at the weekend and will look to fit next week if I can get the cables.I’ll feedback on my progress.
Are you still based in Yorkshire? If so where do you get your car serviced? I’m in Leeds, but from Sheffield originally and have family there still.
Al
Great – that should be much easier with you having the HK setup – would be good to hear how you get on with it.
Afraid I’m not in Sheffield anymore (though I do still travel up on occasion to visit family and friends) – I moved to Hertfordshire a number of years ago and there are a few Mercedes/AMG specialists fairly local to me so I go to one of them for anything that I can’t do myself!
Never really looked into any options in Yorkshire but (for my car at least) the A and B services weren’t actually that expensive from Mercedes themselves compared to a good specialist near me.
Len.
Hi. I have a cls 320 with The ntg 2.5 retrofit.
I just bougth The camera og lookede at your perfekt DIY. Thanks. I also bought a media interface (code 518) i could see you also have made this upgrade. But i cant find any DIY??
The only Think i in douth about i where you place The media box ?? Can you help here.
Many Thanks from kenneth Denmark.
Hi Kenneth,
I also did the media interface upgrade – I didn’t do a full DIY guide for this unfortunately and it was a little while ago so details are a bit hazy!
I do remember that I placed the media box itself in the passenger foot well behind the carpet and near the kick plate and just secured it using an extra nut and an existing through bolt that was already there. As long as it is secure it doesn’t really matter where it is located really.
The next bit was running the cables from the NTG2.5 head unit to the interface box and then from the interface box to the glove box for the media connector input. I cut an appropriately sized rectangle into the inner glove box to insert the media cable connector into from behind.
Hope that makes sense!
Hi leonard.
its super.
i found a place over the glovecompartment and got i SCN code so it work fine.
mi car already has the hole for the media cable
BUT now come the next problem.
i mountede the rearview camera like you but it wont work.
when we use the STAR i says that the media interface already use the video input
what to do???
do i need a SCN coding for that also??
That sounds correct, I think – the media interface is the main video input. The reversing camera is different – not a ‘proper’ manually switchable input.
If the reversing camera is connected to the green fakra input on the rear and it doesn’t switch automatically when you go into reverse gear, then that is what needs to be coded (STAR developer mode) on the comand unit but I’m not sure of the sequence for this – mine was already set to work!
I’ve also seen these adapters that could work but I’ve not used one before so couldn’t say for sure:
http://amzn.to/2xCAhDY